
Today I got my hands on the Lego WeDo 2.0 kit for the first time. We have fifteen sets in school, so I'm getting to grips with them before we introduce them in lessons.
First Opening
When you first open the kit all of the blocks are collected in a few sealed plastic bags. The first task is to arrange them into the handy tray. There are stickers provided which you can affix to the compartments of the tray. The stickers show the blocks which belong in that compartment, helping you keep things organised. Unfortunately it doesn't show the quantity of each block.The next step is putting batteries in the Smart Block. Of course this depends on you having remembered to buy some batteries (or the rechargeable battery pack). So after a quick trip to the shops I set to work. This was the first point where the lack of any instructions with the kit became frustrating. After a quick google I got it sussed: hold the Smart Block with the curved edge towards you and push away on the top white part. It should slide back then pop off as shown in the pictures below.


I've since found a guide on the Lego Website to setting up Lego Wedo 2.0 kits for the first time.
Building a Project
Before you start you will need to download the software from the Lego Education Download page. Once again the lack of instructions proves frustrating, as does the poor interface. There is not a lot in the way of on-screen instructions or guidance which means users can easily get lost. There don't even seem to be tooltips which means hovering over icons still doesn't give you any idea what they do!After digging through the Teacher Guide (from the software home screen, click the icon at the top-right with an i on it), I found a handy guide on page 185

- Press Add New Project button to create a new project.
- Press on an existing project to get back to a saved file.
- Press the Startup video button to take a tour of the WeDo 2.0 Software.
- Press the Information icon to access the teachers’ guide and other support material.
Starting a new project brings up the Getting Started and Guided Projects tab automatically. A couple of clicks gets you on your way to with one of the sample projects, including a cute introduction video. The actual building of the project is well guided, with brick-by-brick instructions.


Coding the Project
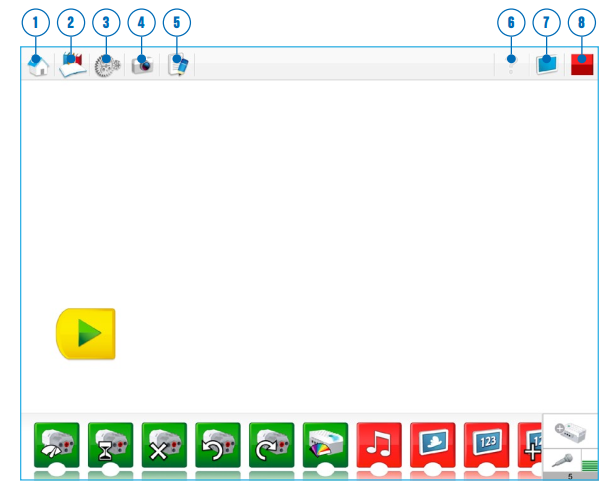
- Press the Home icon to get back to the Lobby.
- Press the Project Library icon to get access to WeDo 2.0 projects.
- Press the Design Library icon to get access to the building and programming inspiration.
- Press the Capture tool icon to access the WeDo 2.0 Software’s built-in camera, video, and screen capture tool.
- Press the Documentation tool icon to access your project document.
- Press the Help icon to access additional information.
- Press the Display icon to show or hide the display text or image feature.
- Press the Stop icon to stop all actions of the program.
The block coding interface is the weakest part of Lego WeDo. While you can hit the help button to get a list of the buttons and what they are, the lack of tooltips on the buttons or text is really disappointing and makes getting started tough. Even the guide only provides the name of the button, but no proper explanation of what it does - for example how exactly is the Start on Message button supposed to work? I also found the demonstration code shown in the project guide to be quite small, making it occasionally difficult to follow.


I did, however, manage to build the first two projects successfully - although the performance of the distance sensor project was a bit unpredicatable.
I had lots of issues with the bluetooth connection with the Smart Block; The connection fails after every execution of the program or about half a minute of inactivity, and has to be restarted every time. Apparently this is a known issue with Win 7, Win 10, and a lot of models of Android tablet. It has something to do with the Smart Block's use of Bluetooth Low Energy (BLE) and differences in the way this is handled in different operating systems. Little progress seems to have been made to resolving this issue and the only solution seems to be to purchase and use a Bluetooth Low Energy BlueGiga dongle (around £15-£30).
Lego WeDo 2.0 and Scratch
 Frustrated by the official Lego coding interface, I went hunting for alternatives. To my delight it turns out that Lego WeDo 2.0 can be used with Scratch (At least under Win 10). In your Scratch project go to the More blocks tab, and click Add an Extension. Choose Lego WeDo 2.0, then OK. Your new blocks should appear. To connect to the Smart Block, you will need to install the Scratch Device Manager. If it doesn't appear automatically, click the red circle above the new blocks to bring up the Extensions popup. Follow the instructions on screen to install the software and connect to the Lego Smart Block.
I found the Scratch interface much more intuitive to use. I shall have to investigate whether this works under other versions of Windows too. I suspect it won't work on Android or Chromebook though.
CAS Barefoot have a lesson to introduce using WeDo 2.0 with Scratch that is worth checking out. Registration is required, but it's free and well worth it for the excellent resources.
Conclusion
Lego WeDo 2.0 is a fun kit that could be made even better with the addition of a couple of extra lego blocks (like an actual camera which would allow path following). I can see that there is a lot of potential here for use in the classroom to demonstrate some physics concepts and coding. However the kit is seriously let down by the poor software, with shamefully poor stability in Win 7 and Win 10 and a user interface that utterly fails at being intuitive.Some time ago Chromebook support was announced. I'm looking forward to testing this. It will make things a lot easier if we can use our Chromebooks in class with the kits!
No comments:
Post a Comment